Adjusting host file
What is a host file and how to adjust it?
How can I adjust my host file?
If you want to redirect your domain to a specific IP address or a server, you can do this via your host file that is stored locally on your computer. The advantage is only you will see this adjustment, others that view your website will see just the ‘right’ redirection.
What is a host file?
The host file is a file that is available on your computer locally, where you connect your host names to IP addresses. A host name is a name of specific websites and is being used by people by typing the host name in the address bar. Computers and operating systems communicate with each other, however via IP addresses. Therefore, you need to connect a host name to an IP address.
Your operating system first looks at whether there is a connection between the host name and IP address locally (via your host file) by default. In case there is no connection, your operating system will make this connection with the Internet Provider to connect the right IP address.
So, the adjustments you do are only visible for you. The advantage of it is that you can view a website on another server, without other people can see it. This could be useful when switching to another web hosting provider.
Adjusting host file in Windows 10
How do you adjust your host file in Windows 10? This can be done relatively easily. You can adjust your host file in 4 useful steps:
- Open notepad as a administrator
- Open the host file via: C:\Windows\System32\drivers\etc
- Add a new line at the bottom of the host file with the IP address and host name
- Save the file and check the adjustment
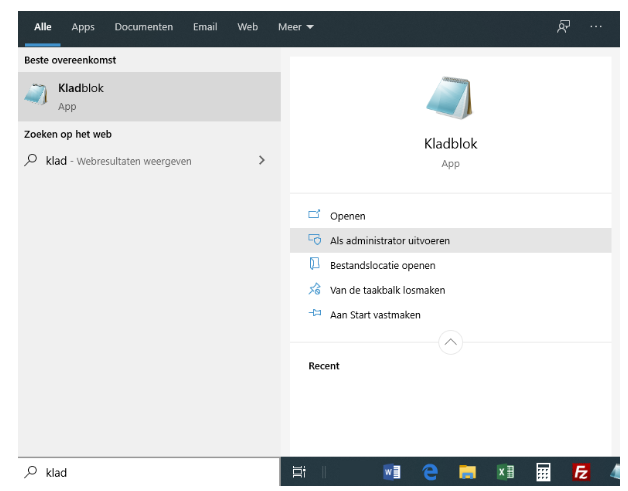
Step 1: Open notepad as a administrator
Type “notepad” in your Windows search bar and open it as administrator. By clicking the Windows key and start typing (notepad) you will eventually achieve the same result.
Before opening the file, you need to confirm that you allow the program (so Notepad) to make changes to the computer.
Step 2: Open the host file via: C:\Windows\System32\drivers\etc
Via File -> Open… you navigate to your host file. Your host file can be found in the folder C:\Windows\System32\drivers\etc.
You may have to change the bottom right of your window (red frame) to All files (*.*). Once you have done this, you also see the file ‘hosts’.

Step 3: Add a new line at the bottom of the host file with the IP address and host name
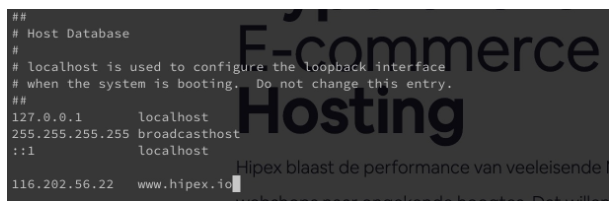
Then, a new line has to be added to the host file. This line starts with the IP address, then press the tab key on your keyboard and enter the host name (domain name).
Do you want to adjust specific subdomains, you need to add a new line for it. Do you want to stop the redirection, you add a hashtag (#) before the line and this redirection will be ignored.
Your host file should look something like this:

Step 4: Save the file and check the adjustment
Lastly, you save the file. Otherwise, the adjustments will not come through. So do not forget this!
Now, you only have to visit the website via the web browser and check if everything works. If correct, the host name is adjusted to the IP address you have submitted. Moreover, this is only visible from your computer.
Adjusting the host file on a Mac
Adjusting the host file on your Mac can be done via the terminal. At least, go through the following steps:
- Step 1: Open your terminal (spotlight).
- Step 2: Enter one of the following two commands:
sudo nano /private/etc/hosts
sudo vi /private/etc/hosts
And then, press enter.
- Step 3: Enter your password and click on enter.
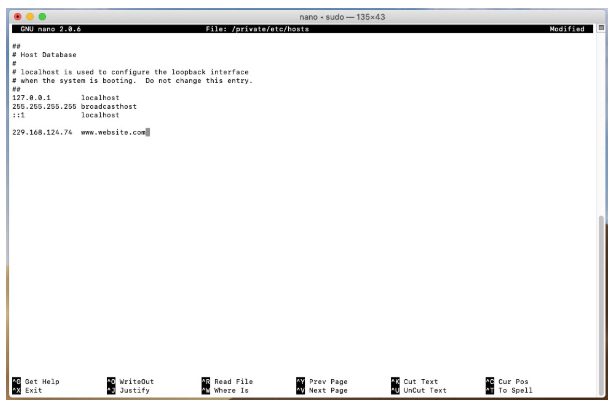
- Step 4: Enter the IP address and host name on a new line, as can be seen in the image below.
- Step 5: Push on Control+O and save the file.
- Step 6: Run the following command: dscacheutil -flushcache and test all changes.
Adjusting the host file on a Linux system
Also on a Linux system, it is possible to adjust the host file. Therefore, you need to run through the following steps:
- Step 1: Open your terminal
- Step 2: Enter the following command:
sudo nano /etc/hosts - Step 3: Enter your password
- Step 4: Enter the IP address and host name on a new line, as can be seen in the image below
- Step 5: Push CTRL+X followed by an Y and an enter.